When we was implementing a customer relationship management for a local client using Drupal, we faced this challege:
- The client wanted to manage records of his patients with many treatment images captured by his iPhone
- Each iPhone images can be large, 5 to 10MB depending on resolutions
- While we can't hold so many large images to the web server, the disk space will soon run out
So we have to find a way to resize and compress images quality on the client side before uploading so they won't place burdens to the web server.
After googling around, we found a tip on this thread mentioning DropzoneJs. So we tried it and successfully reduce image sizes to 10% (from 3M to 300kb) while maintaining image quality.
In this tutorial, we will show you how to configure DropzoneJs in Drupal 10 to resize and compress images on client sides before uploading.
Update 2024
We found another helpful module which does the job of reducing image size effectively. The module name is Image Style On Upload, it is highly underrated.
It does the job nicely by applying a predefined style (defaultly 2000x2000px) to an image on upload, resulting that image can be reduced upto 10 times of the original size.
The installation is straight forward. After installing and enabling the module, the default style of scaling with maxium 2000x2000px applied to all images uploaded via the default image uploader of Drupal.
We tested it with a 3MB image, it is reduced to 1/10 of the original site. Very helpful.


If you still want to achieve the same result with DropzoneJS, please continue.
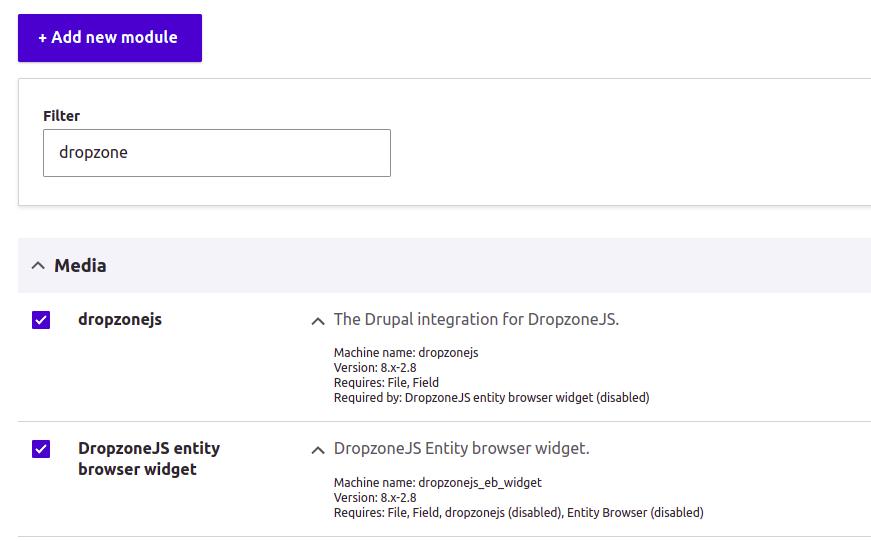
1. Install DropzoneJS and Entity Browser:
Please follow instructions to install DropzoneJS and Entity Browser modules
- DropzoneJS: https://www.drupal.org/project/dropzonejs
- Entity Browser: https://www.drupal.org/project/entity_browser
Download DropzoneJs and Exif-JS libraries and place them to /libraries folder, so the js files can be accessed as:
/libraries/dropzone/dist/min/dropzone.min.js
/libraries/dropzone/dist/min/dropzone.min.css
/libraries/exif-js/exif.js
Enable DropzoneJs and Dropzone Entity Browser widget, it will also enable Entity Browser module, as below:
2. Create a Dropzone browser:
Please browse Admin - Configuration - Content authoring - Entity Browsers and Add a new Entity browser, name it Dropzone for example, and leave default settings.


On the next screen "Widget settings", please select Dropzone.

On the form below, please check the option "Use client side resizing" (note: it won't be checkable if you don't install Exif library as on step 1), then you will be able to select max width, max height and resize quality. We put 1920px for width and height, then image resize quality as 0.8 on our case.

Save it.
3. Configure file upload widget
On your content type with image fields, please choose Manage form display, and set the widget to Entity browser

4. Test the upload:
Now edit a node with image fields, the DropzoneJs browser is now displayed:

We uploaded a test image, a fullsize image from our mobile camera, 3MB.

After uploading successfully, we checked that file on our server, it was reduced to 300K, only 10% of the original size.

It is done. Now you can use DropzoneJs to resize and compress images on client sides before uploading, which is great for your web server.